The images are not in order. The main structure will be fitted with all the mechanical, electrical and plumbing and then the pre-fit, pre-surfaced outer panels will be re-installed, final fit and then refinished on the car. This has although not been the conventional way with most cars, it seems to be the best for the Healey. The seals and inner door panels are also installed for final fit so the doors etc. flush out properly when finished.
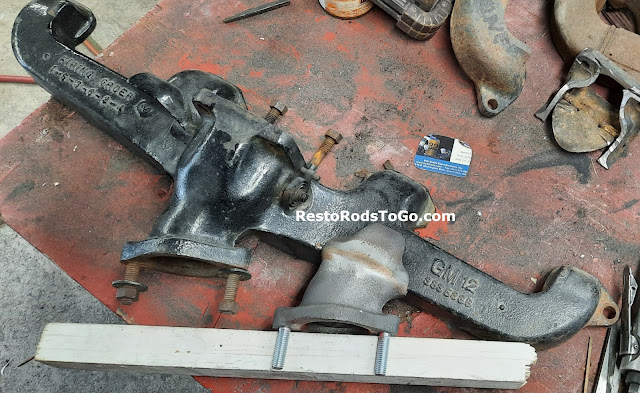
STOVE BOLT SIX CHEVROLET 216 235 261 SPLIT DUAL EXHAUST MANIFOLD
I've been splitting these manifolds since 2005 and this one is the best so far. I have split the 216 manifolds and 235/261 manifolds.
I ran 216 manifolds on my 235 in my 1937 Chevrolet pickup. The reason being is that I wanted to use the vintage Edelbrock intake manifold with 216 Stromberg BXOV2 carburetors and the original pancake air cleaners. I actually found a couple original fiber elements to go in the pancake housings too. That will likely not be duplicated as the fiber elements are about as rare as hen's teeth.
This split manifold gives your inline stovebolt six great breathing capacity and incredible sound. With the block that I install between the two halves it has a very crisp cackle.
The distinct advantage in this manifold over the Fenton, besides the look of factory engineering, is the fact that it retains the heat riser capability which prevents carburetor icing.
This split manifold requires two original manifolds to build. The output flange doesn't need to be specific to your manifold as in 216. 235, or 261 as long as the output is matched in angle whether it be straight out or angled back.
With the shrinking dollar, I need $700 to do one like this. Contact me Doug@RestoRodsToGo.com Still a great deal when you compare the Corvette manifold for well over $1000 now for a good one. If you can find one.....
Vintage Turn Signal Switches For Sale Guide 6004
Here are a couple examples of what I have. If you're interested in a nice vintage switch and have specific preferences, please contact me Doug@RestoRodsToGo.com and give me a phone number. Confidentiality will be strictly respected. Thank, Doug
1946 Studebaker M5 Restoration Project Continued
The 1946 Studebaker M5 has been out and had a good reception at the local informal car show. There were about 170 cars and trucks at the JC Penny parking lot last Saturday. It was a very nice sunny day and people were tired of the Covid 19 lockup, so everyone was out, and there were several cars that I had not yet seen.
I wish I would have got some pictures of the highlights or what I consider so.
I think JC Penny is completely out of business here in Sequim now. Saturday may have been their final day. Not quite sure on that but..
Anyways, here are a few images of the current condition of the 46 M5....
1946 Studebaker M5 Restoration Project continued
The restoration project on the 1946 Studebaker M5 pickup truck is nearing completion.
I hadn't planned to take it to this level when I purchased it, but here we go... Where do you stop on something like this?
I probably have way more invested in this truck than I will be able to recover, but we'll see when I list it. I'm leaning towards listing it with "Bring A Trailer" as I've heard from friends that they are pretty successful in sales.
Well, here's a picture of the front end and cab pretty much completed, other than polishing and a few other minor details, and the bumper.
There'll be no rattles in this machine and the fit is no doubt better than new.
Volkswagen Bus Body Restoration
I accepted this project as a body restoration and preparation for paint.
The bus was to be painted with single stage paint but after the preparation and deliver to the painter who sent the project to me, the plan changed to base/clear which requires finer sanding prep.
I later learned about the change when I picked up the bus for final assembly.
Much to my disappointment, I realized that someone had gone over our prep work with a power sander, which caused some serious surface imperfections.
To top that off, literally, the clear coat was a disaster. I won't elaborate on that subject but I will say that the surface preparation on the Volkswagen was super flat and super straight when it left my hands.
You can see the body is likely the straightest Volkswagen you've seen with the exception of the gouging from the DA sander and the sags in the clear coat.
The time and the expertise involved in getting the fit and surface on the Volkswagen to this level was extremely challenging and to have that completely compromised in couple days was very disappointing.
The VW had quite a lot of damage to it from both wrecks and amateur paint stripping. Every panel had major damage and warpage.
I did have new panels for the front but the rest were just not available.
1946 Studebaker M5 Pickup ongoing restoration.
Restoring the Studebaker pickup has become a daily process. In removing and cleaning the bed, I find that it is also in exceptional condition which goes along with the rest of the truck. The rear bed crossmember required a bit of straightening as it had been obviously hit in the past, and the bed sides were slightly slanted left in the rear. So that issue is corrected now too.
The bed floor is in very good condition with only minor dents and dings but all the ribs are as strait as they came from the factory. The underside displays a lot of the original red oxide primer and behind the rear fenders, the original paint looks almost new.


